08 December 2013

Attachments in Gmail 2013

Gmail launched the new attached file handler in November, and those familiar with using Google Drive and/or Google+ Photos will adapt with ease, as the viewer will be familiar to them. For others it has been difficult to get used to. This post deals with some of the main questions being raised in the Gmail Help Forum.

Contents:

I can’t view my attached files
I can’t download my files any more
I am now forced to save everything to Drive

I want to choose where to save my files!
I cannot right-click and save where I want any more
I want to see my image attachments in a browser window, not in the Viewer
I want to see a list of my attachments, not thumbnails
I don’t want this and want to turn it off completely

My attachments have long filenames and I can’t see them all or distinguish between different files
I need to copy my filenames

I need to view all attached documents as HTML in a new browser window or tab

I can’t view my attached files
I can’t download my files any more
I am now forced to save everything to Drive


To view any attachment that can be viewed in the Drive Viewer, click anywhere in the thumbnail other than on the Drive and Download buttons. It the file cannot be viewed then you will be shown an option to download it to your computer so you can open it with whatever program you have installed that can deal with such files.


To download any file to your computer, hover over the thumbnail and click the Download button. If there are multiple attachments and you want to download them all, use the Download All button. Your attachments will save to your computer as a zip file, like they always did.

To save files to Drive - which is completely optional - hover over the thumbnail and click the Save to Drive button. You can choose where to save it from the dropdown menu. If there are multiple attachments and you want to save them all to Drive, use the Save All button. Your files will save individually to My Drive.


I want to choose where to save my files!

If you left your browser at its default settings, and you choose the Download button in your attachment thumbnail, then the file will download automatically, without asking you, to your default Downloads folder, just like it always did.

If you always want to choose where to save your files, then set your browser up to always ask you where to save files. Firefox and Chrome have specific settings for this. IE does not, so always be sure to choose Save As in IE’s download pop-up if you want to choose the download destination.


I cannot right-click and save where I want any more

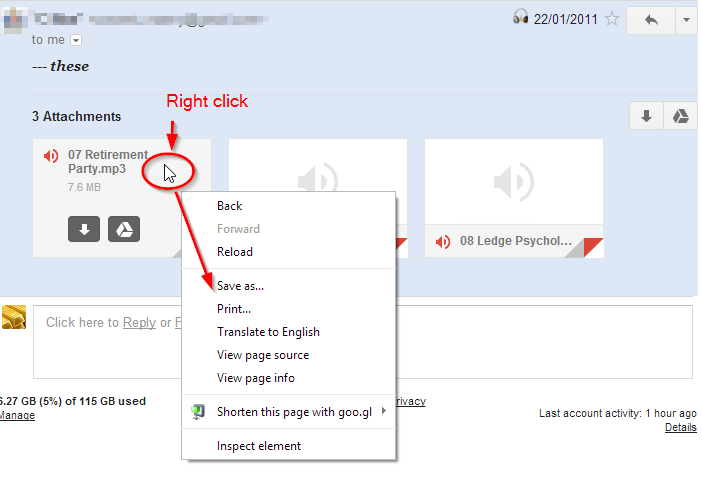
For those that do not want to change their browser settings to always ask, but still want to choose where some files are downloaded to, the right-click and Save Link/Target As option still works for most types of file.

For all common file types - images, Zip files, MS Office files, PDFs, .txt - right-click the thumbnail. Anywhere in the thumbnail is good, as long as you aren’t clicking on the Download or Save to Drive buttons, but a good habit might be to right-click the filename. Choose Save Link As (Chrome and Firefox) or Save Target As (IE).

In Chrome, you will go straight to a File Selector - pre-populated with the filename - to choose your destination folder.


In Firefox you will go to the Firefox-specific Open/Save file-handler where you choose to Save, before seeing the pre-populated File Selector to choose your destination folder.


In IE you will see the normal IE pop-up box, where you choose to Save As, before seeing the pre-populated File Selector to choose your destination folder.


For less common filetypes - like .mp3, .indd - this does not work.


The right-click brings up only a “Save As” choice, which produces a File selector offering to save as an HTML document. Such files will need normal Download to your computer using the download button, so you can open them there with a suitable installed program.

If you haven’t set your Download options in your browser (see above) then they will download to your Downloads folder.

If you have set your browser to always ask, you will see a File Selector in Chrome, and the proprietary download handlers in Firefox and IE, where you must make your choice to Save or Save As before seeing the File Selector.

I want to see my image attachments in a browser window, not in the Viewer
I want to see a list of my attachments, not thumbnails
I don’t want this and want to turn it off completely


Reverting to the old attachment handler is not an option. You can work around it by reverting to an old version of Gmail when dealing with multiple image attachments.


Note that with the exception of the first option, of using Gmail’s own Basic HTML View (see above) , these workarounds are not guaranteed to continue to work. They all access an older version of the Gmail code - and as these older versions are no longer likely to be maintained, in time they are going to break, producing erratic results or even complete failures. But if you are willing to take that risk....
  • Temporarily switch to Basic HTML when handling attachments. Make a bookmark for https://mail.google.com/mail/?ui=html and click it to make the switch. Then click back to Standard using the links top or bottom when you are done, or
  • Install the IE Tab extension/add-on in Chrome or Firefox and switch to that view, or
  • Download and install the Gmelius extension/add-on in Chrome or Firefox and set it to use old Compose, which will also revert the attachment handler
  • If you use Internet Explorer, you can set it to emulate IE8 using the IE Development Tools in order to go back to the old attachment handler.
However, everything you could do in a browser window with images you can still do in the Viewer.


You can zoom by using the Zoom tool and manually moving the slider, or by using a wheelmouse to trigger and operate the Zoom function, or by using scroll strokes on a trackpad to trigger and operate the Zoom.

You can move around the image when you are zoomed in by holding the left mouse/trackpad button and dragging the image around, or dragging the little window in the Zoom box around.

If you are viewing multiple images, you can move to the next image by clicking the right-pointing arrowhead on the side or using your keyboard arrow keys. Or if you have selected View All and are showing thumbnails, click another thumbnail.


The Viewer also offers many other options like Download, Save to Drive, Print, View All to see a row of thumbnails (when there are multiple attachments), move back and forth through multiple images. etc. etc. You can even copy the filename if that is important to you.

My attachments have long filenames and I can’t see them all or distinguish between different files
I need to copy my filenames, and Gmail won't let me


The thumbnail has enough room to show about 60-70 characters of the filename (including spaces and the file extension), depending on word length and how the filename wraps in the limited space available. This should be ample for the majority of filenames.


If some correspondents send you files with whole paragraphs as their filenames, then hover over the filename in the thumbnail to see a tooltip containing the full filename - the screenshot below shows a 100-character name, but up to 200 characters can be accommodated in the tooltip. The Viewer also has enough space for approx 200 characters. As Windows has a filename limit of 255 characters - which has to include spaces as well the full path to the document - 200 characters is about the limit you are ever likely to encounter as a filename.

To copy file names, workarounds include
  • Click the thumbnail to open the viewer and copy the name from there, (see screenshot in previous section) or
  • Click Download and copy the filename from the pre-populated File Selector - you can then dismiss the File Selector if you are not downloading, or continue with the Download.
  • Switch temporarily to Basic HTML using your bookmark (see above) and copy the filename from the message
I need to view all attached documents as HTML in a new browser window or tab

This option disappeared from Standard View some years ago, although it has been available in the Google Docs viewer by selecting it from the View drop-down or pressing H.

It is no longer available as an option in the new Drive Viewer.

To have your attachments display in a new tab or window as HTML, switch temporarily to Basic HTML using your bookmark (see above) and use the View as HTML option that is still provided for document files.

Conclusion

This post doesn't attempt to be a complete "how to" for the new attachment handler, but is meant to address the most common questions being asked by users right now in the Gmail Help Forum.

For Gmail's own Help pages, go here: https://support.google.com/mail/answer/30719
For more Help with using the Drive Viewer, go here:   https://support.google.com/drive/answer/2423485?hl=en&ref_topic=2375192

17 August 2013

New Compose without tears - for serious email users

Many serious and frequent Gmail users feel new Compose is unsuitable for a busy email environment, because in their use-cases, multiple To: and From: addresses are in use, multiple attachments need to be added, and longer and more complex mail altogether is required to be sent....

Here’s how to overcome some of the apparent limitations and tune up the new interface to be just as reliable and straightforward as the old interface was....

1. Window sizes and how to choose them
2. Addressing your mail
3. Managing Attachments
4. Replying and Forwarding
5. Spell-checking
6. Handling quoted text

Window sizes and how to choose them


First - decide what size window you will generally want to use for Compose. Set up a workflow for yourself and your users to always achieve that size window. (NB In all cases below, where “click Compose” is mentioned, you can, of course, use the keyboard shortcut of just pressing “c” on your keyboard.) You can:
  • Use the small box docked in the lower right if it meets your needs - this small window has a collapsed formatting toolbar, which needs a click to open it up. All other larger windows have an expanded formatting toolbar by default.
  • Use a mid-size (what Gmail calls full-screen!) fixed position window -
    • either popped out from the docked box - click the double ended pop-out arrow in the upper right
    • or set up as default - choose to set it as default from the More menu in the lower right of your Compose box, so that it then appears when you click Compose
    • Note: holding down Ctrl and Shift while pressing the pop-out/pop-in icon offer several further options - as shown in the screenshot


  • Use an adjustable floating window which can be expanded and even maximised to fit your entire computer screen by
    • Holding down Shift while you click Compose
    • Popping it out from the docked box by holding Shift when you click the double ended pop-out arrow
  • Use a new tab which gives an entire browser tab to Compose by
    • Holding down Ctrl while you click Compose - this produces a new tab which you then switch to, create your message, Send/Save it, and then switch back to Gmail
    • Clicking Compose as normal and then holding down Ctrl while clicking the double ended arrow in the docked box - this produces a similar tab to the above
    • Turning on keyboard shortcuts and pressing “d” on the keyboard - this opens a new tab, switches you to it automatically, and then sends you back to the Gmail Inbox automatically when you are done Sending/Saving
       (Tip - if you are a keyboard user and like this Tab option, then turn on the Custom Keyboard shortcuts in Settings/Labs and you can remap the “d” shortcut to “c”, so that pressing “c” will open the new tab by default.)
Once you have your window size set and have established a work flow for you and your users to always have the size you require on demand, then set up a workflow for using the Compose window you have chosen.
This will include addressing your message, entering and formatting the message,
adding attachments or embedded images to the message and handling quoted text from earlier messages

Addressing environment of the new interface:


Gmail uses a single Recipient area to hold To:, CC and BCC addresses/names and the From: address if more than one From: address is available - i.e. when the account has at least one Send Mail As address set up which is different from the basic account address. If no other Send Mail As address is set up, then the From: address is not visible as it is assumed to be the address of the account currently being used, and there are no other addresses available for use in any case.

The Recipient box is collapsed once addresses/names have been entered, and the user has moved to another part of the message window, and shows only one line of recipients at the top, with a button indicating how many other addresses are in the panel. Click anywhere in the box to re-expand and see all detail, although if you are using a full width window, you may actually be able to see all your recipients listed, even when the Recipient area is collapsed.


When the recipient area is expanded, names of contacts are shown as “chips” rather than as fully expanded email names and addresses.

If a user does make an error whilst addressing, and puts an address in To: or CC or BCC which should be elsewhere, it’s easy to just drag the chip to the right addressing box.

If a user makes an error and adds an incorrect address, it’s easy to remove it by clicking the “x” on the name chip.

To move or remove all of the chips from one address area to another, click in the list and use Ctrl-a to select them all - then they can be dragged or deleted all together

NOTE: if a contact has more than one address, the domain name or even the entire address is always displayed on the chip after the name to avoid address confusion errors.e.g. Dick Jones’s Hotmail address and his work address will be shown on his contact chips as “Dick Jones (hotmail.com)” or “Dick Jones (hisdomain.com)” as shown above.

So, given this addressing environment, what’s the best way to use it to avoid errors?

There are a two common choices, of which the first is the most logical to avoid user errors.
  • Type the message first - then add attachments, if any - then click in the Recipients box and address the message last of all.
    • This is the least error-prone as there is no time to forget what files have been attached and no time to forget what addresses the message has been sent to via To:, CC or BCC - because those are the last things you do. There’s no need to check and double-check all the time by clicking in and out of various sections.
    • And, of course, with no recipient addresses having been entered, you can’t inadvertently send the message before it is ready!   
    • Just add the addresses when you are done and ready to send, noting the domain names on the chips of anyone with multiple addresses to make sure you have the right one, drag the name chips around, if necessary, to get everyone in the right box, and then you can hit Send.
  • Address the message first, then type the message and add any attached files last of all.
    • This is more prone to user error because after putting the correct addresses into To:, CC: and BCC:, dragging namechips about if necessary to get it right, they then still have to write the message and finally add attached files if any.
    • So this may require an extra click in the Recipient box to expand it and make sure before sending that the original entries were correct - especially if the user can’t now remember exactly what was entered in which address box or whether all addresses were correctly added in the first place.

What about attachments?


These are no more troublesome than before - in fact, if you are a drag and drop devotee, they are even easier.
To add an attached file in the conventional way, click the paperclip icon towards the lower left-hand side of the window. This pulls up a file selector box (usually part of your underlying operating system’s File Manager) - navigate to the folder where your files are stored, select them (you can generally use Ctrl and Shift to select multiple files as allowed by your File Manager) and click Open. The files will then upload to Gmail and appear at the bottom of the message window. A chip (similar to the contact chips already mentioned) with a progress bar will appear as each one uploads, and when the upload is finished, the filename will turn blue and an “x” will appear in the attachment chip for easy removal if you have made a mistake and attached the wrong file.


Alternatively you can use drag and drop. First find the file you want to drag and drop using your system’s File Manager. Then, if it is a picture file and you want to add it in the body of your message as an embedded image (only picture files can be embedded), drag the file to the message area of the window. If you want it to be an attached file, drag it towards the paperclip. In both cases the proper “drop area” will be indicated for you and you can then drop your file and watch it upload to Gmail.


Previews of embedded pictures will automatically fit the window size you are currently using - although the complete file will be sent, the visible preview will fit your window. If your recipient also uses Gmail, they too will see a preview that fits their own window, but again, the complete file has been sent so they can either view your file, or download the full size picture by right clicking and choosing Save.


Previews of attached images will appear for your recipients (and in your own copies in Sent Mail) as smaller thumbnails at the bottom of the message they are attached to, with View, Share, and Download options appearing next to their filenames.


And what about Replies?


Replies are probably the least problematical, as they are not really much different to before. When you click Reply, the Reply window opens up at full message window width right underneath the message you are replying to and most addressing information is inserted automatically. The header area is collapsed by default because of this automated entry, but can be easily expanded for checking or amendment with a click.


The To: address will be the address of the person you are replying to. The automatically inserted From address will be whatever From: address you have set as your default preference in Send Mail As. That will either be your default address, if you specified that, or the address the message was sent to, if you specified that. To add CC and/or BCC copies for other contacts, or to change your own From address, just click the collapsed box to expand it and make your changes.


As you type into a standard Reply box, it looks rather shallow to start with, but it will expand upwards until it fills the whole area of your Gmail message window. If you continue to type, you will be given a vertical scroll bar so you can scroll up and down to see all your Reply.


BUT if you want a bigger window for your Reply than the default, similar to those shown above in the section on window sizing, then there are several ways you can achieve that - those with the least clicks involved are:
  • Adjustable window: hold down Shift while you click Reply, which will pop your reply out to a docked box, then continue to hold Shift and hit the double ended arrow in the upper right of your docked box. You then get the floating, expandable window which can be maximized to fill your whole screen.
  • Mid-sized window: hold down Shift when you click Reply and then just click the double ended arrow in the upper right of the docked box to get the fixed position mid-sized window
  • Full size tab: hold down shift while you click Reply, and then hold down Ctrl while you click the double ended arrow in the upper right of the docked box. That will open your Reply in a new tab which you can then switch to.
What if I want to break out this reply to form a new conversation?
Open your Reply window in the way you prefer, and click the arrow to the left of the Recipient's name - pick Edit Subject and your Reply will pop-out to a new window where you can make your changes. The reply, when sent, will form the start of a new conversation, and subsequent replies will join the new conversation, not the old original one.


What if I don’t want to Reply after all, but want to Forward instead?
Either click Forward to start with, using the same procedures as above for Reply, but also entering the address you want to forward to.


Or open your Reply window in the way you prefer, and click the arrow to the left of the Recipient’s name and choose Forward. Enter the address you want to forward to and make other modifications as above.


Spellchecking


Gmail’s integral spell-checker offers multiple language dictionaries, but is otherwise fairly rudimentary. It’s a manually operated tool, with no automation and no check-as-you-type features. For those who like to use it, it can now be found under the More menu in the lower right corner of the Compose/Reply window.

However, as all mainstream browsers now have excellent spell-checkers built-in, which provide check-as-you-type functionality and are generally enabled by default, the Gmail spell-checker becomes less and less relevant. The browser spell-checkers all work in the same manner - mis-spellings are underlined with red wiggles as you type each word, and a right-click pops up a box with various suggestions. In the same pop-up box, most spell-checkers will allow you to add unrecognised words to the dictionary, which allows you to build up a spell-checker dictionary which works for you, even if you have a particular specialist vocabulary - e.g. legal or medical terms - that isn’t normally covered.

For info on how to use the spellcheckers in the mainstream browsers, visit:
Firefox: http://support.mozilla.org/en-US/kb/how-do-i-use-firefox-spell-checker
Chrome: https://support.google.com/chrome/answer/95604?hl=en-GB
Internet Explorer v10: http://ie.microsoft.com/testdrive/Browser/SpellChecking/
Opera: http://help.opera.com/Windows/12.10/en/spellchecker.html

And finally, quoted text


One of Gmail’s least desirable characteristics is its insistence on including the entire text of the message you are replying to as quoted text, and then hiding it! Not only can you not easily refer to the message you are replying to once the original above has scrolled out of sight, but if this reply is the latest in a long line of exchanges between you and one or more other correspondents, that quoted text could run to pages and pages and pages.....most of it completely unnecessary.
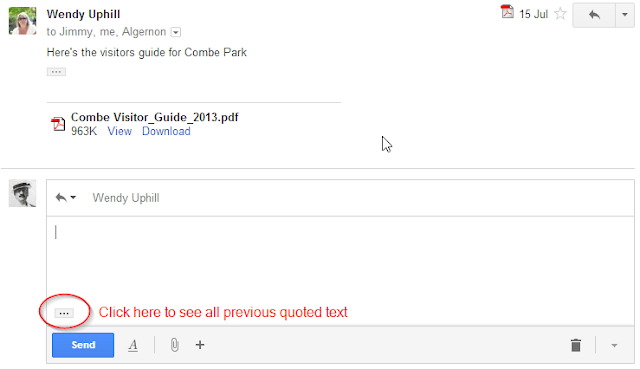
To actually SEE and refer back to the quoted text attached to a message you are replying to click the little “...” icon - called the ellipsis.


If, after revealing all the quoted text attached to the message, you are horrified by the amount of unnecessary verbiage you are continuing to propagate around the internet mail system, select it all and simply delete it. A quick way to do that is to chit Ctrl-a, and then just start typing...

Or, to handle your replies more intelligently with a minimum of quoted text, enable the Quote Selected Text lab in Settings/Labs.

What this neat little tool does is to allow you to pick the part of a message you have received that you want to address in your reply. So look at the message you are about to reply to, highlight the sentence or paragraph you want to talk about in your reply, and then click Reply.
That will wipe out all other quoted text leaving just the text you selected - and you can formulate a sensible reply to a specific topic without continuing to send endless pages around the mail system to no good purpose.


If you like to reply “in-line” - i.e. interspersing your comments between quotes - it also makes that a little more straightforward. Before hitting Reply, select the paragraph/s of text containing the comments you want to address - you can easily delete any surplus quoted text as you go along - and insert your own replies between the quotes. Gmail will differentiate between the quoted text - which is indented - and your in-line replies, but you can, if you wish, add some colour or other formatting here to make the differentiation clearer.

If you would always like to see the quoted text by default, instead of having it hidden, there is another neat tool available as an add-on/extension for both Firefox and Chrome called Trimless.
For Chrome:  https://chrome.google.com/webstore/detail/trimless-for-google-mail/niepjjjfafhadmfdminbckmciijcaagc
For Firefox: https://addons.mozilla.org/en-us/firefox/addon/trimless-for-google-mail/developers

When you install Trimless, the “...” ellipsis is banished, and all quoted text is revealed by default. It’s an eye opener! But it does mean you can instantly see and refer to - without clicking - the message you are replying to, and can delete any unnecessary text, retaining only salient points relevant to your reply.

Conclusion

Whilst new Compose is a different animal altogether to its predecessor, and in the interests of a “clean” look and feel, requires a little additional work to get the same efficient results, those results are still achievable. No functionality has been removed - it is all still there, but is accessed in different ways.

Hopefully, you now know some of those ways in more detail, and will feel more comfortable in Gmail’s new interface than before.

But why? What’s it all about?
Why has this apparently unnecessary change to a key part of the interface been considered important by Google? That’s not for us to know right now, but given the slow but steady move towards product integration Google-wide, one can guess that the transformation of the Gmail Compose/Reply interface into a stand-alone module will see Gmail able to be used in other situations in the future.
Perhaps we can look at Chat/Hangouts and Tasks - which are also stand-alone modules - for pointers? Tasks are available in Gmail and also in Calendar. Hangouts are available both in Google+ and Gmail. The way is now open for Gmail in its native form to be available in Drive, in Photos/Picasa, in YouTube....and how good might it be in the future to click on a mail-to: link on any web site and have a real Gmail compose box pop-up down there in the bottom right corner?

03 August 2013

Gmail & the Apple Notes App

There are frequent questions in the Gmail Help Forum regarding Notes that have been stored by the Apple Notes App in Gmail accounts. Apple provide no detailed instructions for using their Notes App, nor do their support documents explain exactly how Notes are "synced" to Gmail accounts, or indeed to any other email account that a Notes user might choose.

This leads to extreme confusion amongst Notes users, with regular disappearance of apparently saved Notes.

So I have spent a number of days trawling through all the various support sites, including Apple's own Support Forums, to try to determine how this strange little App actually works. The result is a whole mass of anecdotal evidence, which - while it makes it clear how this App works - is not backed up by any official Apple documentation. Nor can I test any of these suppositions based on the anecdotal evidence, because I do not own an iPhone or any other type of iDevice, and don't know anyone I can borrow one from for some testing.

So with that caveat in mind, here's how Notes appears to work, and how it appears to work specifically with Gmail accounts:
  • Apple Notes users can elect to have their Notes stored "On my iPhone/iPad/Mac" or synced to any email account of their choice (though with some versions of iOS, Notes Sync = ON appears to be a default setting)
  • If Notes users choose the former, all well and good - that's what happens. Notes are stored on the Apple device only, and there are no issues
  • If users choose the latter (or don't set the sync option to OFF), then the Notes app will send their Notes from their devices via Gmail to Gmail (or the email account of their choice) using an IMAP connection, in much the same way as an IMAP client works.
  • They appear to arrive in Gmail as both outgoing and incoming messages, labelled as Notes and archived on arrival. They are actually "Sent Mail", although this label is also suppressed during the IMAP transfer, and they do not usually appear under the Gmail Sent Mail label, unless Gmail accounts go through maintenance and have their Sent Mail re-labelled.
  • This initial transfer is one way only. Notes cannot be "restored" or sent back from Gmail to the iDevice
  • Once Notes have been created and sent to Gmail they are deleted from the device - no copies are kept on the device at all.
  • Henceforth, when a user calls up their Notes on the Apple device, the Notes app accesses them from Gmail to display them in the Notes app on the device
  • If Notes are then deleted from Gmail in the web interface - and many users do delete them, because they don't know what they are, don't know why they are there, and if they do know why they are there, they mistakenly consider them to be duplicates of data already stored on their device - the Notes are gone from Gmail and cannot therefore be accessed by the device. They will survive for 30 days in Gmail's Trash, where they are inaccessible by the Notes App but still recoverable by the user.
  • If they are deleted using the iPhone/iPad Mail client, although most iDevices "delete" to All Mail, deleting the Notes folder in the Apple Mail App removes the label in Gmail. So the Notes App can't access them anyway, even though the Notes are still present in All Mail without a label. So to all intents and purposes, the Notes are gone.

Fixes?

That depends on what the user has actually done.
  • If the Notes have been deleted from the Gmail account whilst in the web interface, they will exist - plus their Notes label - in Gmail's Trash for 30 days before being auto-deleted. During that time they can be restored to their previous position. If that happens, then the Notes App will once again be able to access them, and will resume showing them in the Notes App on the iDevice
  • If the Notes folder was deleted using the Mail App on the iDevice, then the Notes probably all still exist in All Mail in the Gmail account. But they have no label. Searching All Mail - preferably using the web interface - and re-applying the Notes label to any found Note will restore those Notes to the App on the iDevice

Solution?

Don't sync your iDevice Notes to any of your email accounts - if you value your Notes, there are too many areas where user error can occur for this to be safe. Keep them on your iDevice. Make a point of using your iDevice account settings to turn OFF synchronisation of your Notes to any of your email accounts.
 

27 June 2013

Organizing your Gmail Inbox

The new tabbed inbox option in Gmail has prompted many questions about message organisation from users who may not have considered managing their inboxes in the past.

So it seems worthwhile to set out in one place how you can manage your mail using one of the several inbox types built into Gmail.

Classic Inbox
Unread First - Starred First - Important First
Priority Inbox
Multiple Inboxes
Tabbed and Categorised Inbox
How to turn Tabs and Categories off again!
Summary and Useful Links


“Classic” Inbox (now called Default)

There’s a full rundown with lots of screenshots on how to manage a Gmail “Classic” Inbox using labels, stars, archiving, etc, in Chapter 5 of my blog post called Gmail 101 - find it here: http://gmail-miscellany.blogspot.co.uk/2012/11/gmail-101.html?utm_source=BP_recent#organize1

But briefly, this is the original and most basic view of a Gmail account’s Inbox. All messages and conversations are listed in chronological order, newest on top, and appear in a continuous paged list with no organisation at all. You can choose in Settings/General how many messages/conversations to view on a page, to a max of 100. To move between pages, click the Older and Newer arrows in the upper right above the Inbox list.

How to turn it on
To get to this view, first choose Default (which has replaced “Classic” in the menu list) from the dropdown menu next to Inbox at the top of your label list on the left.
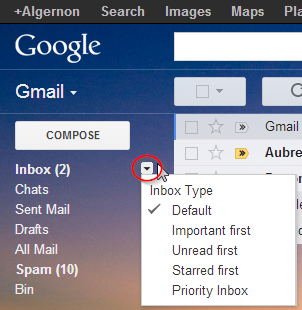


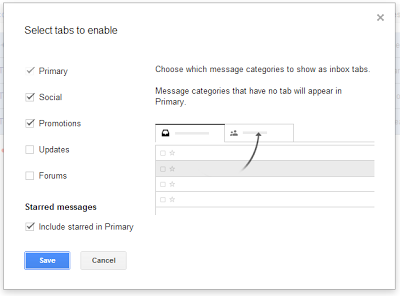
If you then see the new tabbed Inbox view, which splits your Inbox up into Categories, then you need to first turn off the tabs. Click the gear icon and choose Configure Inbox, and then uncheck all the tabs.


How to use it
That will put you into the Default view with just a primary inbox on display, and you can start to manage your mail using Gmail’s built in tools:
  • Labels can be applied to messages to help visually distinguish them from others, either manually, or by using a filter to catch certain messages when they arrive and give them a specific label. You might choose one label for anything to do with Work, and another for mail relating to your Sports Club, etc.
  • Colouring the labels aids visual recognition of particular labels.
  • Users can change their view and see just those messages with a specific label by clicking that label in the lefthand sidebar. So it becomes easier to see all your Work mail together, or messages from members of your Sports Club, instead of seeing them spread throughout your Inbox list.
  • As well as your own labels you can add stars to your mail, and then view all your starred mail together by clicking on the Starred label in your sidebar.
  • You can then combine labelling and archiving to move messages out of your Inbox once you have dealt with them, but keep them available in your account so you can still see them when you click their label. The Labels and Archive buttons do that for you, and you can even do both jobs at once by using the Move button, which labels and archives a message with a single action.
  • Mail you don’t want any more can simply be deleted - select the message and hit the Trash can button. But use this with care - mail you send to Trash will be deleted permanently 30 days later, and once deleted permanently it cannot be recovered.
Many users find that this “classic view” when combined with labels and stars, along with filtering and archiving, does all they require. But read on if you would like to know more...


Unread First - Starred First - Important First

These are ready-made selectable views of your Inbox, and as the name of each suggests, it will filter out some of your Inbox mail and place it in a separate section of its own at the top of your Inbox, with your remaining Inbox mail underneath in Everything Else.

How to turn it on
Simply click the dropdown menu next to Inbox at the top of your label list, and pick the view you want to use


How to use it
This view makes it easy to keep track of mail you haven’t yet read - or mail you have starred - or mail Gmail has marked for you as Important. Sections can be collapsed using the “twisty” next to their name if you want to temporarily get them out of your way.
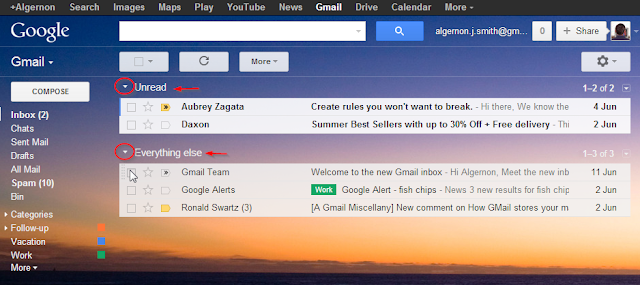


(NB Unread First will not show you ALL the mail you haven’t read - only the mail which is unread and still in your Inbox. The same goes for Starred First and Important First - they relate only to mail still in your Inbox, not to mail you may have archived. To see ALL your Starred mail, or ALL the mail that has been tagged as Important, you can click those labels in your sidebar.)

All the normal Inbox functions such as labelling, archiving, starring, etc will work just as they do in the Classic inbox - with the proviso that mail that has its status changed by an action you take may move out of the top section and into Everything Else.. For example, mail you read will move out of Unread and into Everything Else. Mail you add a star to will move into Starred and out of Everything Else. Mail you “move” by adding a label and archiving it will disappear from your Inbox altogether, and so on.

The Important Marker
In an effort to help you prioritise your mail handling, Gmail has an automated feature that looks at a number of different indicators when a message arrives, and decides whether or not this message is likely to be important to you. Those indicators include things like how often you read mail from that person; how often you reply to mail from that sender; how frequently you correspond with that sender, etc. If it judges that the message is important, it is flagged with a yellow tag that appears in your message list. if you hover over the yellow tag, you will see the reason that Gmail marked the message as important.


If you disagree that the message is important, then click the yellow tag to turn it off.

Or if you see a message that IS important, but Gmail has missed it, click the blank placeholder to turn the tag on.


In this way you can train Gmail to assess your mail more accurately, and after a while, the automatic application of the yellow tag becomes pretty reliable!

If you don’t want to be bothered with the markers, you can turn them off in Settings/Inbox. On that page, you can also choose whether the Important marker should over-ride any of your own filters or not. For example, if you want mail from a certain sender to always skip the Inbox, even if it is marked Important, you would set the feature to NOT over-ride your filters.
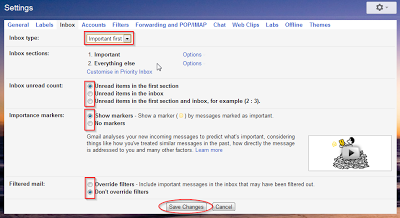


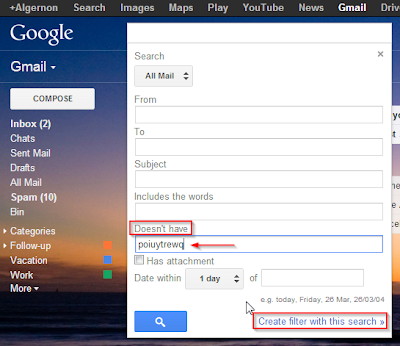
If you don’t like this concept at all and don’t want Gmail to assess or tag your mail as Important, you can turn it off: create a filter that will trap all your incoming mail - a nonsense string like “poiuytrewq” in the Doesn’t Have box does that very reliably - and choose “Never Mark Important”.


Priority Inbox

You can extend the concept of Unread/Starred/Important First by using Priority Inbox. This offers you four user-definable “inboxes” at the top of your page, followed by Everything Else underneath. As with the more limited “First” views, if a message appears in one section it will not appear in any of the other sections underneath it.

How to turn it on
The Priority Inbox view can be turned on by clicking the dropdown menu next to Inbox at the top of your lefthand sidebar.


How to set it up
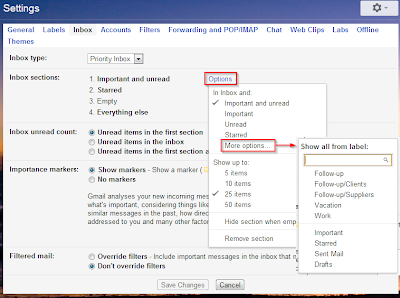
When you have enabled Priority Inbox, go to Settings/Inbox to set it up. The four definable sections can use any of the available configurations, in any order - and do not in fact have to be confined strictly to mail that is in your Inbox. You may find some default choices for the content of the first 2-3 sections, but these are configurable - just click Options to select what you want to see in each section. The first four options listed for your sections are “In Inbox and... Important & Unread, Important, Unread and Starred. These present your mail in much the same way as the “First” options we’ve already talked about. But as there can be more than one section, it’s important to remember that each section has priority over the ones below it.

For example, if you have an unread message in your Inbox that you have also starred, and you choose to show your “In Inbox and Unread” mail right at the top, then your unread starred message will appear in that section. It will not also appear in your “In Inbox and Starred” section which is the second section. But if you then read that message, it will no longer be Unread, so it will drop into the applicable section with the next highest priority - the “In Inbox and Starred section”. If you then unstar it, it will drop into Everything Else.

Other choices for your sections are
Any of your own labels - which shows all of them, in Inbox and archived
Any of Important, Starred, Sent Mail and Drafts - again, all of them, in Inbox and archived


How to use it
Experiment with the various sections and how you can define them to find an arrangement which suits you best. For example, I have an Action label which I like to see right up top, displaying all my mail with that label, whether or not I have archived it. Then I have my In Inbox and Unread section, and In Inbox and Starred comes third. I don’t define the fourth section, so Everything Else brings up the rear.

Once you are used to the way this works, it is an elegant solution to managing your mail, and keeping what’s important to you at the top of your list.


Multiple Inboxes

The Multiple Inboxes lab can be enabled in Settings/Labs and offers the most comprehensively user-definable Inbox you can have! In fact, if you can search for a certain type of message, you can define an Inbox section for it!

How to turn it on
Whereas all the other types of inbox can be selected from the dropdown next to Inbox at the top of your sidebar, you need to make a few adjustments manually to use this lab. So first choose Default (previously called “Classic”) from the Inbox type dropdown menu. If this shows the new tabbed Inbox view, then you need to turn off the tabs. Click the gear icon and choose Configure Inbox, and then uncheck all the tabs. Once you are in Default view with just a primary inbox on display, then you can configure the lab to show you up to five additional sections.


How to set it up
When enabled, Multiple Inboxes has its own Settings page, where you can configure the five extra Inboxes which will show along with your normal classic Inbox. These can appear to the right of your main Inbox list, or either above or below the main Inbox list. You can also pick how many messages/conversations to show in each section. Once you have defined each of your sections, you can - if you wish - archive the “found” messages from the Main inbox. They will still appear in their own section, but will be out of your way in your Main list.
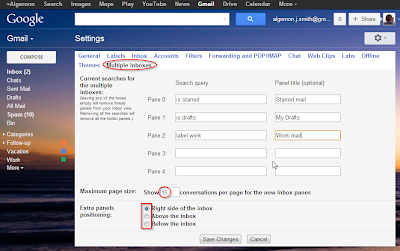


Unlike Priority Inbox, Multiple Inboxes doesn’t work like a filter, but as a number of sets of search results - so you may see apparent duplicates in your different views if a message or conversation matches more than one of your definitions. And as already stated, the results you choose to show are limited only by Gmail’s search capability! You define a specific search for each box, and the messages displayed will be the results of that search.

For example, if you are working on a specific project for the next few weeks/months, and want to quickly be able to find emails containing all the new drawings and PDF spec sheets sent to you by the designers in the last 3 months, you could define a separate Inbox section with a search something like this:

label:ProjectA filename:jpg OR filename:pdf newer_than:3m from:drawingoffice@domain.com

That search will show you exactly what you want to see: all the mail with the project label, that has a JPG or PDF attachment, that’s less than three months old and is from the designers’ email address.

How to use it
Once set up, the mail shown in your Multiple Inboxes can be managed and handled in the same way with as all other mail.

Last but not least


Categorised Tabbed Inbox

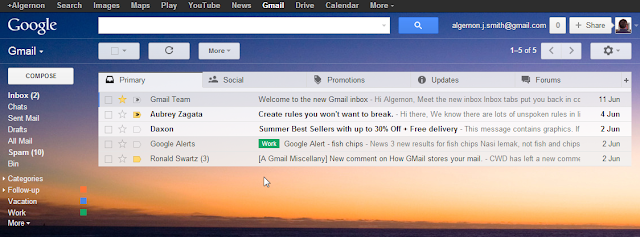
This most recent effort by Google to help us organise our mail takes a different approach altogether, by filtering four types of not-so-important mail out of our Primary Inbox, and displaying it in tabs alongside. This enables us to review or act on it at our leisure, instead of having it clutter up our inboxes demanding to be dealt with when we are busy! In the same way as an automated feature flags our Important mail, the new Categories are assigned by an automated scan of our incoming mail.


How to turn it on
The new Tabbed inbox is turned on by choosing Default from the Inbox dropdown menu, and then by clicking the gear icon and choosing Configure Inbox. Here you turn the tabs you want to see on and off. If you turn a tab off, the mail that would have appeared there will instead be shown in your Primary Inbox.


The tabs are not user-configurable - they are pre-set to contain Social, Promotions, Updates and Forum messages, all of which can easily be identified by the automated scan, and the tabs cannot be altered.

How to use it
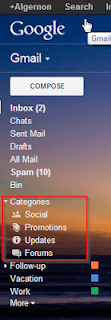

The tabs contain only the mail that is in your Inbox. Mail you have archived will not appear in tabs, but can be viewed when necessary using the Category labels in the sidebar.

By default, the category labels are brightly coloured for ease of recognition, although you can change the colours if you wish using the little dropdown menu that appears next to each label. You can also hide or show the labels in your sidebar label list and in your message lists (both hidden by default) using the same dropdown menu.


If Gmail gets a category wrong, there are three ways to put that right -

Drag the message out of the wrong tab and into the right tab


Right click the message and choose a different category


(Each time, you will be asked if all mail from that sender should now go to the new category.)

And thirdly, the Tabbed Inbox has its own newly added filter assignments, so you can also create a filter to always have messages which meet a certain criterion - e.g from:amazon.com - given a specific category label when they arrive.


As a bonus result of this new Inbox view, you also get a rightclick menu in all Inbox types that not only re-assigns categories where relevant, but allows you to delete or archive the message, or change its Read/Unread status without having to mouse up to the button bar.

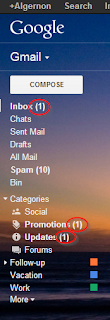

As new mail arrives in the tabs, it will be flagged up briefly with a coloured tag, both on the tab and in the tab list, although this will go away once the tab has been viewed. There is no unread count for the tabs themselves - the unread count next to Inbox in the sidebar relates only to the Primary tab. The unread count for the whole category can, however, be seen next to the category label in the sidebar - and if you keep up to date with your mail and don’t archive categorised messages without reading them, those unread counts will generally reflect what is in your tabs in the Inbox.

How to turn it off and ignore it completely!
For those who do not want to use this Inbox view, and would prefer not to even know about categories, virtually everything can be turned off or hidden using Gmail’s built in options . The only place that you cannot hide the category labels easily are in the dropdown lists under the More and Label buttons, where unassigned category labels will appear at the end of the assignable labels list. (However, see below for a third party way to remove these!)

  • To hide the sidebar labels - select Hide in Label list from each category label’s dropdown menu
  • To hide the labels from your message lists, if you enabled them - choose Hide in Message list from each category label’s dropdown menu
  • To remove all the tabs, click the gear, choose Configure Inbox and turn them all off.
  • To turn off categorisation completely, create a filter to catch all your Incoming mail - a nonsense string like “poiuytrewq” in the Doesn’t Have box does that very reliably - and choose to have all your mail categorised as Personal. You can also apply the filter to remove the category labels from existing mail. That will put ALL your incoming mail into the single Default Inbox


And finally, for Firefox and Chrome users, to remove the last vestige of categories from even your Move and Label dropdown menus, Gmail user Mario KruĊĦelj has discovered how you can add extra filters in the Adblock Plus browser extension to hide them completely. His solution is published in the Gmail Help Forum here: https://productforums.google.com/d/msg/gmail/MDWXUKCHrPw/agHnDvMQOTQJ

Firefox users need to install the Element Hiding Helper for Adblock Plus and Adblock Plus add-ons. Then go to ABP filter preferences, then select "Custom Filters" tab, followed by "Element Hiding Rules", then click "Add Filter". Now add the following eight filters:

mail.google.com##.J-N[title="Social"]
mail.google.com##.J-N[title="Promotions"]
mail.google.com##.J-N[title="Updates"]
mail.google.com##.J-N[title="Forums"]
mail.google.com##.J-LC[title="Social"]
mail.google.com##.J-LC[title="Promotions"]
mail.google.com##.J-LC[title="Updates"]
mail.google.com##.J-LC[title="Forums"]

For Chrome users, install the same two browser extensions. In the Options for the Element Hiding Extension, paste the above into User Filters box and click Save.

Adblock Plus and the Adblock Plus Element Hiding Helper are available from www.adblockplus.org.


Summary and Useful Links

Each of these Inbox types is exclusive - you have to pick just one of them. Which is why it is worth experimenting to find the view that fits best with the way you work.

It’s not possible to mix and match tabs from the new categorised Inbox with sections from Multiple Inboxes, and you can’t use Unread First as well as the tabbed Inbox.

But once you have decided on the Inbox arrangement which is best for you, the abilities of Gmail to label, star, archive and generally help you organise your mail will enable you to get closer to “Inbox Zero” if that’s your ambition - or at least keep your mail under better control!

Inbox Styles & Settings: https://support.google.com/mail/answer/186534?hl=en
Inbox Categories and Tabs: https://support.google.com/mail/answer/3055016?hl=en
Inbox Categories and Tabs on your mobile: https://support.google.com/mail/answer/3094499?hl=en
Multiple Inboxes videos: http://www.googlegooru.com/top-gmail-labs-multiple-inboxes/
http://www.techwithintent.com/2012/05/gmail-multiple-inboxes-keep-you-informed/
Priority Inbox: https://support.google.com/mail/answer/186531
Priority Inbox video: http://www.googlegooru.com/how-to-set-up-priority-inbox-in-gmail/
Organising your mail with labels, stars, etc:
http://gmail-miscellany.blogspot.co.uk/2012/11/gmail-101.html?utm_source=BP_recent#organize1
Creating filters: https://support.google.com/mail/answer/6579?hl=en
Creating and using labels: https://support.google.com/mail/answer/118708?hl=en
Archiving: https://support.google.com/mail/answer/6576?hl=en
Deleting: https://support.google.com/mail/answer/32608?hl=en