Google currently provides a choice of a light or dark overlay, just like those in their pre-built themes, but there is no way to modify them and no way to change the text colors
So here's how to do that yourself!
There's a very simple script below for Stylish in Firefox or Chrome. Stylish is a browser extension/add on which lets you easily install and manage userstyles - "themes" for web sites created by modifying a site's Cascading Style Sheet (CSS). You can add, delete, enable, disable, and organise your userstyles with a few clicks of a mouse. Stylish's companion website, userstyles.org, hosts tens of thousands of user styles made by other Stylish users that you can try.
This short script for Stylish lets you change:
1. Unread message background colours and degree of opacity
2. Unread message text colours for sender, subject and timestamp
3. Read message background colours and degree of opacity
4. Read message text colours for sender, subject and timestamp
5. Background colour and degree of opacity for messages you have selected
6. The colour and opacity of the line which divides your message rows in the list
7. The colours of alternating message in Conversation view, to help you distinguish one from the other
First of all, install the right version of the Stylish browser extension from userstyles.org, depending on which browser you are using, Firefox or Chrome.
Pick your image next - you can upload one of your own from disk, grab one you uploaded earlier from My Photos or Picasa WebAlbums or choose from the gallery provided in the new Custom Background theme. Work out what colours you think will go well with it.

http://www.rapidtables.com/web/color/RGB_Color.htm
There's a long list of toning colours, grouped in "families", giving all their RGB numbers, or you can pick your own from the colour pickers at the top of the page (see left).
Choose your colours, write down the RGB numbers you want to use for (1) to (7) above and then just alter the script to suit you. You can do this by pasting it from this page into any text editor like Notepad or TextEdit - but be careful to only change the RGBA/RGB numbers.
Here's the script...
It's currently set up with my favourite green background/text colours which work well with GMail's standard Turf and Teahouse themes, and will work with any image that has green as the main colour. You can use it exactly as it is if you like green!
If you'd rather have other colours, all you need to do now is to plug in the new RGB values for the various elements that you have previously chosen and written down. Copy the following lines of code into any text editor.
/* Unread rows - background colour and opacity and text */
.zE {background-color: rgba(230,255,210,0.95) !important; color: rgb(0,80,0) !important;}
/* Read rows - background colour and opacity and text */
.yO {background-color: rgba(210,240,190,0.8) !important; color: rgb(0,80,0) !important;}
/* Selected rows - background colour and opacity*/
.x7 {background-color: rgba(255,250,205,1) !important;}
/* Row dividing line colour and opacity */
.xY {border-color: rgba(140,190,140,0.9) !important;}
/* Alternating message colours in Conversation View */
div.h7:nth-of-type(odd) div.adn.ads, div.kv:nth-of-type(odd){ background-color: rgba(190,220,180,0.65); }
div.h7:nth-of-type(even) div.adn.ads, div.kv:nth-of-type(even){ background-color: rgba(230,255,210,0.85); }
How to amend the script for your chosen colours
To break this down and make it simple, let's take the first line above:
.zE {background-color: rgba(230,255,210,0.95) !important; color: rgb(0,80,0) !important;}
.zE is the Unread message row. To set the background, you need to alter the first three RED numbers in brackets after the "rgba" - that sets the colour. Then alter the fourth BLUE number inside the brackets to control the opacity of the colour you have just set. The scale is 0.05 to 1.0 in increments of 0.05 - and you can set any level that you want to change the look of your style.
As an example, here's a similar screenshot to the green one above, which is set to have opacities of 0.85 and 0.9 - with opacities set at 0.5 - quite a difference!

Then move to the color element further along the line which is just "rgb" - that controls the colour of the text for the sender, the subject and the timestamp. You don't want these to be transparent, so there is no opacity control - just alter the three numbers within the brackets to use the RGB colour you have chosen.
All the other lines in the script work exactly the same way. Change the RGB numbers and select the opacity level if it is shown.
Here's how Conversation View looks - even with the recent improvements, this colour alternation makes it easier to tell one message from the next, and the slightly darker coloration of read messages makes it easier to see what you have read and what you have not read:

And finally....install your script and view it in GMail!
When you have it all tweaked, save your text file, but keep it open, because you'll want to copy from it.

In your browser go to your GMail tab and click the Stylish extension icon - Chrome top right, Firefox bottom left. The interfaces are slightly different in Chrome and Firefox, but it's easy to find your way around.
In Chrome, choose "Manage Installed Styles" and then click the "Write new style" button. A new tab will open (see below) for you to create your code. Copy and paste in your style, give it a name and save it.
You should also add the URL of the site you want it to apply to - in our case, mail.google.com - so from the URL drop-down choose "URLs on the domain" and type "mail.google.com" into the box. Save the style again. Then go back to GMail, and from your Stylish menu, choose the name you gave your new style and click Enable to apply it to GMail.
In Firefox, choose Write New Style from the Stylish menu to get to the code window, and follow the same procedure. To apply your style, click the Stylish icon and check the style you want to use.

Or in Firefox, click Manage Styles, and choose the Edit button alongside your style name. You can do this any time.

Last of all, here it is pre-built for you, as an easy installable userstyle right from the userstyles.org site with an easy method of choosing your colours - just click the link and get choosing....
GMail Message List Colours
See http://gmail-miscellany.blogspot.co.uk/2012/04/userstyles-for-gmail.html for a bit more information and some more screenshots
Making more scripts for different colour schemes
You may be the kind of person that likes a change. So you might want several styles, set up to use different colour sets to go with your favourite background images. To do that, click the Stylish icon, find your script in the Stylish menu and click edit. Select and copy the script in the box. Close the edit window. Then click the Stylish icon again and choose Manage Styles and Write New Style (just as you did before) and paste in the code you just copied. Change the RGBA/RGB values to the new colours of your choice. Give your new style a name and save it. Then head back to GMail to see it working. To switch between your colour styles, use the Disable/Enable options in the Stylish menu.If you have more than one account, and like to have them open at the same time using Multiple Sign-in. the same userstyle will be applied to both accounts. To differentiate them, you can choose different backgrounds - either a standard GMail theme or an image from the gallery in the new Custom Background theme, or one of your own - that tone nicely with the colours used for your message list.
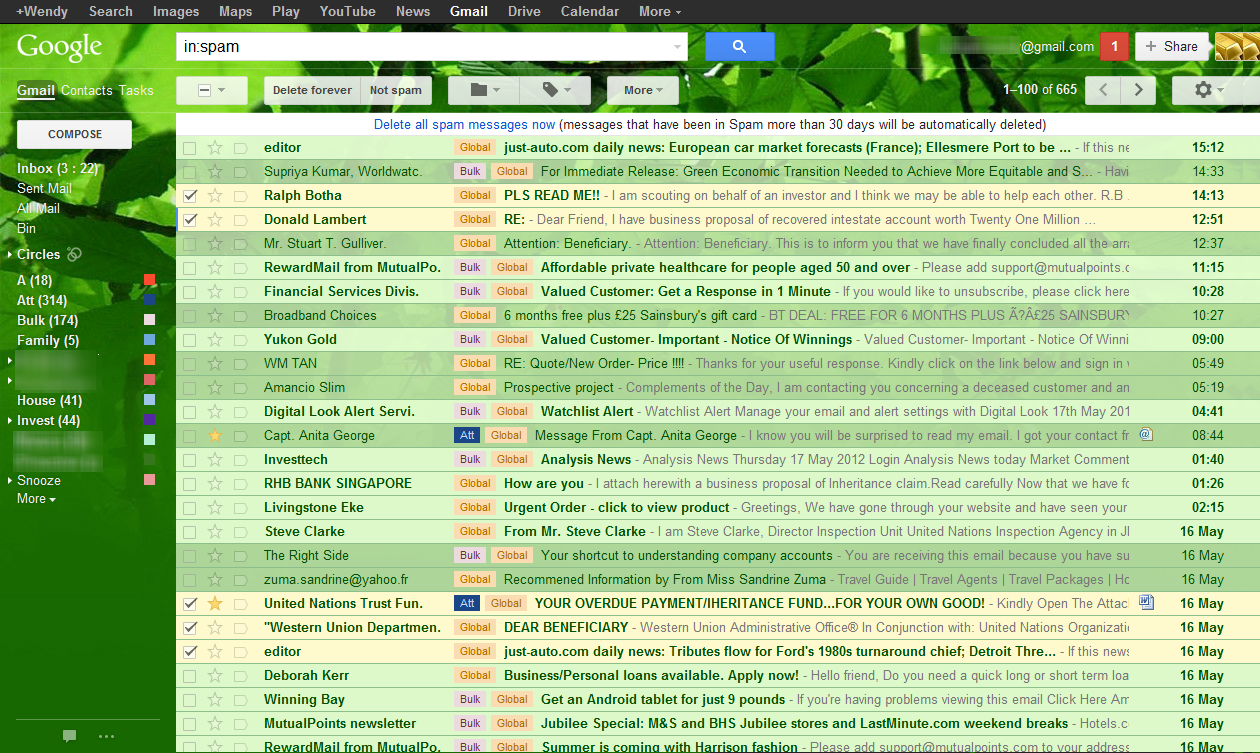
Here are some more screen shots of what you can do using just these few lines of code. I've used my Spam label so that I need to do the least possible redaction to keep the images clear.


If, having digested the above, you really don't want to start messing with GMail's style sheet, there are a large number of pre-written GMail userstyles available at userstyles.org, as well as the one I have written for you (see above) based on this script. I wrote about those in an earlier blog at http://gmail-miscellany.blogspot.co.uk/2012/04/userstyles-for-gmail.html - and you can just install them into Stylish and use "as is".
A particularly useful one - which also mimics the "old inbox look" to a large degree - is "Marina Resurrected". Find it here: http://userstyles.org/styles/65048/marina-resurrected
Unlike many of the pre-written styles, this one allows you to pick your own colours and customise the script before it is installed into Stylish. Each element is listed, with a colour picker beside it, and you can choose from the Marina background or a solid colour - or if you are using the Custom Background theme or another GMail theme, then it will work with any of those images too. The style can also remove the People Widget and the ads in an open message, freeing up that space for wider messages. Here's how it looks with one of the gallery images, and a small tweak to the colour of read messages:
