So it seems worthwhile to set out in one place how you can manage your mail using one of the several inbox types built into Gmail.
Classic Inbox
Unread First - Starred First - Important First
Priority Inbox
Multiple Inboxes
Tabbed and Categorised Inbox
How to turn Tabs and Categories off again!
Summary and Useful Links
“Classic” Inbox (now called Default)
There’s a full rundown with lots of screenshots on how to manage a Gmail “Classic” Inbox using labels, stars, archiving, etc, in Chapter 5 of my blog post called Gmail 101 - find it here: http://gmail-miscellany.blogspot.co.uk/2012/11/gmail-101.html?utm_source=BP_recent#organize1But briefly, this is the original and most basic view of a Gmail account’s Inbox. All messages and conversations are listed in chronological order, newest on top, and appear in a continuous paged list with no organisation at all. You can choose in Settings/General how many messages/conversations to view on a page, to a max of 100. To move between pages, click the Older and Newer arrows in the upper right above the Inbox list.
How to turn it on
To get to this view, first choose Default (which has replaced “Classic” in the menu list) from the dropdown menu next to Inbox at the top of your label list on the left.

If you then see the new tabbed Inbox view, which splits your Inbox up into Categories, then you need to first turn off the tabs. Click the gear icon and choose Configure Inbox, and then uncheck all the tabs.

How to use it
That will put you into the Default view with just a primary inbox on display, and you can start to manage your mail using Gmail’s built in tools:
- Labels can be applied to messages to help visually distinguish them from others, either manually, or by using a filter to catch certain messages when they arrive and give them a specific label. You might choose one label for anything to do with Work, and another for mail relating to your Sports Club, etc.
- Colouring the labels aids visual recognition of particular labels.
- Users can change their view and see just those messages with a specific label by clicking that label in the lefthand sidebar. So it becomes easier to see all your Work mail together, or messages from members of your Sports Club, instead of seeing them spread throughout your Inbox list.
- As well as your own labels you can add stars to your mail, and then view all your starred mail together by clicking on the Starred label in your sidebar.
- You can then combine labelling and archiving to move messages out of your Inbox once you have dealt with them, but keep them available in your account so you can still see them when you click their label. The Labels and Archive buttons do that for you, and you can even do both jobs at once by using the Move button, which labels and archives a message with a single action.
- Mail you don’t want any more can simply be deleted - select the message and hit the Trash can button. But use this with care - mail you send to Trash will be deleted permanently 30 days later, and once deleted permanently it cannot be recovered.
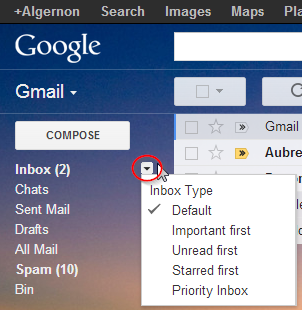
Unread First - Starred First - Important First
These are ready-made selectable views of your Inbox, and as the name of each suggests, it will filter out some of your Inbox mail and place it in a separate section of its own at the top of your Inbox, with your remaining Inbox mail underneath in Everything Else.How to turn it on
Simply click the dropdown menu next to Inbox at the top of your label list, and pick the view you want to use

How to use it
This view makes it easy to keep track of mail you haven’t yet read - or mail you have starred - or mail Gmail has marked for you as Important. Sections can be collapsed using the “twisty” next to their name if you want to temporarily get them out of your way.

(NB Unread First will not show you ALL the mail you haven’t read - only the mail which is unread and still in your Inbox. The same goes for Starred First and Important First - they relate only to mail still in your Inbox, not to mail you may have archived. To see ALL your Starred mail, or ALL the mail that has been tagged as Important, you can click those labels in your sidebar.)
All the normal Inbox functions such as labelling, archiving, starring, etc will work just as they do in the Classic inbox - with the proviso that mail that has its status changed by an action you take may move out of the top section and into Everything Else.. For example, mail you read will move out of Unread and into Everything Else. Mail you add a star to will move into Starred and out of Everything Else. Mail you “move” by adding a label and archiving it will disappear from your Inbox altogether, and so on.
The Important Marker
In an effort to help you prioritise your mail handling, Gmail has an automated feature that looks at a number of different indicators when a message arrives, and decides whether or not this message is likely to be important to you. Those indicators include things like how often you read mail from that person; how often you reply to mail from that sender; how frequently you correspond with that sender, etc. If it judges that the message is important, it is flagged with a yellow tag that appears in your message list. if you hover over the yellow tag, you will see the reason that Gmail marked the message as important.

If you disagree that the message is important, then click the yellow tag to turn it off.
Or if you see a message that IS important, but Gmail has missed it, click the blank placeholder to turn the tag on.

In this way you can train Gmail to assess your mail more accurately, and after a while, the automatic application of the yellow tag becomes pretty reliable!
If you don’t want to be bothered with the markers, you can turn them off in Settings/Inbox. On that page, you can also choose whether the Important marker should over-ride any of your own filters or not. For example, if you want mail from a certain sender to always skip the Inbox, even if it is marked Important, you would set the feature to NOT over-ride your filters.

If you don’t like this concept at all and don’t want Gmail to assess or tag your mail as Important, you can turn it off: create a filter that will trap all your incoming mail - a nonsense string like “poiuytrewq” in the Doesn’t Have box does that very reliably - and choose “Never Mark Important”.


Priority Inbox
You can extend the concept of Unread/Starred/Important First by using Priority Inbox. This offers you four user-definable “inboxes” at the top of your page, followed by Everything Else underneath. As with the more limited “First” views, if a message appears in one section it will not appear in any of the other sections underneath it.How to turn it on
The Priority Inbox view can be turned on by clicking the dropdown menu next to Inbox at the top of your lefthand sidebar.

How to set it up
When you have enabled Priority Inbox, go to Settings/Inbox to set it up. The four definable sections can use any of the available configurations, in any order - and do not in fact have to be confined strictly to mail that is in your Inbox. You may find some default choices for the content of the first 2-3 sections, but these are configurable - just click Options to select what you want to see in each section. The first four options listed for your sections are “In Inbox and... Important & Unread, Important, Unread and Starred. These present your mail in much the same way as the “First” options we’ve already talked about. But as there can be more than one section, it’s important to remember that each section has priority over the ones below it.
For example, if you have an unread message in your Inbox that you have also starred, and you choose to show your “In Inbox and Unread” mail right at the top, then your unread starred message will appear in that section. It will not also appear in your “In Inbox and Starred” section which is the second section. But if you then read that message, it will no longer be Unread, so it will drop into the applicable section with the next highest priority - the “In Inbox and Starred section”. If you then unstar it, it will drop into Everything Else.
Other choices for your sections are
Any of your own labels - which shows all of them, in Inbox and archived
Any of Important, Starred, Sent Mail and Drafts - again, all of them, in Inbox and archived

How to use it
Experiment with the various sections and how you can define them to find an arrangement which suits you best. For example, I have an Action label which I like to see right up top, displaying all my mail with that label, whether or not I have archived it. Then I have my In Inbox and Unread section, and In Inbox and Starred comes third. I don’t define the fourth section, so Everything Else brings up the rear.
Once you are used to the way this works, it is an elegant solution to managing your mail, and keeping what’s important to you at the top of your list.
Multiple Inboxes
The Multiple Inboxes lab can be enabled in Settings/Labs and offers the most comprehensively user-definable Inbox you can have! In fact, if you can search for a certain type of message, you can define an Inbox section for it!How to turn it on
Whereas all the other types of inbox can be selected from the dropdown next to Inbox at the top of your sidebar, you need to make a few adjustments manually to use this lab. So first choose Default (previously called “Classic”) from the Inbox type dropdown menu. If this shows the new tabbed Inbox view, then you need to turn off the tabs. Click the gear icon and choose Configure Inbox, and then uncheck all the tabs. Once you are in Default view with just a primary inbox on display, then you can configure the lab to show you up to five additional sections.

How to set it up
When enabled, Multiple Inboxes has its own Settings page, where you can configure the five extra Inboxes which will show along with your normal classic Inbox. These can appear to the right of your main Inbox list, or either above or below the main Inbox list. You can also pick how many messages/conversations to show in each section. Once you have defined each of your sections, you can - if you wish - archive the “found” messages from the Main inbox. They will still appear in their own section, but will be out of your way in your Main list.

Unlike Priority Inbox, Multiple Inboxes doesn’t work like a filter, but as a number of sets of search results - so you may see apparent duplicates in your different views if a message or conversation matches more than one of your definitions. And as already stated, the results you choose to show are limited only by Gmail’s search capability! You define a specific search for each box, and the messages displayed will be the results of that search.
For example, if you are working on a specific project for the next few weeks/months, and want to quickly be able to find emails containing all the new drawings and PDF spec sheets sent to you by the designers in the last 3 months, you could define a separate Inbox section with a search something like this:
label:ProjectA filename:jpg OR filename:pdf newer_than:3m from:drawingoffice@domain.com
That search will show you exactly what you want to see: all the mail with the project label, that has a JPG or PDF attachment, that’s less than three months old and is from the designers’ email address.
How to use it
Once set up, the mail shown in your Multiple Inboxes can be managed and handled in the same way with as all other mail.
Last but not least
Categorised Tabbed Inbox
This most recent effort by Google to help us organise our mail takes a different approach altogether, by filtering four types of not-so-important mail out of our Primary Inbox, and displaying it in tabs alongside. This enables us to review or act on it at our leisure, instead of having it clutter up our inboxes demanding to be dealt with when we are busy! In the same way as an automated feature flags our Important mail, the new Categories are assigned by an automated scan of our incoming mail.
How to turn it on
The new Tabbed inbox is turned on by choosing Default from the Inbox dropdown menu, and then by clicking the gear icon and choosing Configure Inbox. Here you turn the tabs you want to see on and off. If you turn a tab off, the mail that would have appeared there will instead be shown in your Primary Inbox.
The tabs are not user-configurable - they are pre-set to contain Social, Promotions, Updates and Forum messages, all of which can easily be identified by the automated scan, and the tabs cannot be altered.
How to use it

The tabs contain only the mail that is in your Inbox. Mail you have archived will not appear in tabs, but can be viewed when necessary using the Category labels in the sidebar.
By default, the category labels are brightly coloured for ease of recognition, although you can change the colours if you wish using the little dropdown menu that appears next to each label. You can also hide or show the labels in your sidebar label list and in your message lists (both hidden by default) using the same dropdown menu.
If Gmail gets a category wrong, there are three ways to put that right -
Drag the message out of the wrong tab and into the right tab

Right click the message and choose a different category

(Each time, you will be asked if all mail from that sender should now go to the new category.)
And thirdly, the Tabbed Inbox has its own newly added filter assignments, so you can also create a filter to always have messages which meet a certain criterion - e.g from:amazon.com - given a specific category label when they arrive.

As a bonus result of this new Inbox view, you also get a rightclick menu in all Inbox types that not only re-assigns categories where relevant, but allows you to delete or archive the message, or change its Read/Unread status without having to mouse up to the button bar.

 As new mail arrives in the tabs, it will be flagged up briefly with a coloured tag, both on the tab and in the tab list, although this will go away once the tab has been viewed. There is no unread count for the tabs themselves - the unread count next to Inbox in the sidebar relates only to the Primary tab. The unread count for the whole category can, however, be seen next to the category label in the sidebar - and if you keep up to date with your mail and don’t archive categorised messages without reading them, those unread counts will generally reflect what is in your tabs in the Inbox.
How to turn it off and ignore it completely!
For those who do not want to use this Inbox view, and would prefer not to even know about categories, virtually everything can be turned off or hidden using Gmail’s built in options . The only place that you cannot hide the category labels easily are in the dropdown lists under the More and Label buttons, where unassigned category labels will appear at the end of the assignable labels list. (However, see below for a third party way to remove these!)
- To hide the sidebar labels - select Hide in Label list from each category label’s dropdown menu
- To hide the labels from your message lists, if you enabled them - choose Hide in Message list from each category label’s dropdown menu
- To remove all the tabs, click the gear, choose Configure Inbox and turn them all off.
- To turn off categorisation completely, create a filter to catch all your Incoming mail - a nonsense string like “poiuytrewq” in the Doesn’t Have box does that very reliably - and choose to have all your mail categorised as Personal. You can also apply the filter to remove the category labels from existing mail. That will put ALL your incoming mail into the single Default Inbox


And finally, for Firefox and Chrome users, to remove the last vestige of categories from even your Move and Label dropdown menus, Gmail user Mario Krušelj has discovered how you can add extra filters in the Adblock Plus browser extension to hide them completely. His solution is published in the Gmail Help Forum here: https://productforums.google.com/d/msg/gmail/MDWXUKCHrPw/agHnDvMQOTQJ
Firefox users need to install the Element Hiding Helper for Adblock Plus and Adblock Plus add-ons. Then go to ABP filter preferences, then select "Custom Filters" tab, followed by "Element Hiding Rules", then click "Add Filter". Now add the following eight filters:
mail.google.com##.J-N[title="Social"]
mail.google.com##.J-N[title="Promotions"]
mail.google.com##.J-N[title="Updates"]
mail.google.com##.J-N[title="Forums"]
mail.google.com##.J-LC[title="Social"]
mail.google.com##.J-LC[title="Promotions"]
mail.google.com##.J-LC[title="Updates"]
mail.google.com##.J-LC[title="Forums"]
For Chrome users, install the same two browser extensions. In the Options for the Element Hiding Extension, paste the above into User Filters box and click Save.
Adblock Plus and the Adblock Plus Element Hiding Helper are available from www.adblockplus.org.
Summary and Useful Links
Each of these Inbox types is exclusive - you have to pick just one of them. Which is why it is worth experimenting to find the view that fits best with the way you work.It’s not possible to mix and match tabs from the new categorised Inbox with sections from Multiple Inboxes, and you can’t use Unread First as well as the tabbed Inbox.
But once you have decided on the Inbox arrangement which is best for you, the abilities of Gmail to label, star, archive and generally help you organise your mail will enable you to get closer to “Inbox Zero” if that’s your ambition - or at least keep your mail under better control!
Inbox Styles & Settings: https://support.google.com/mail/answer/186534?hl=en
Inbox Categories and Tabs: https://support.google.com/mail/answer/3055016?hl=en
Inbox Categories and Tabs on your mobile: https://support.google.com/mail/answer/3094499?hl=en
Multiple Inboxes videos: http://www.googlegooru.com/top-gmail-labs-multiple-inboxes/
http://www.techwithintent.com/2012/05/gmail-multiple-inboxes-keep-you-informed/
Priority Inbox: https://support.google.com/mail/answer/186531
Priority Inbox video: http://www.googlegooru.com/how-to-set-up-priority-inbox-in-gmail/
Organising your mail with labels, stars, etc:
http://gmail-miscellany.blogspot.co.uk/2012/11/gmail-101.html?utm_source=BP_recent#organize1
Creating filters: https://support.google.com/mail/answer/6579?hl=en
Creating and using labels: https://support.google.com/mail/answer/118708?hl=en
Archiving: https://support.google.com/mail/answer/6576?hl=en
Deleting: https://support.google.com/mail/answer/32608?hl=en